Controlling Car Ambient Lights With the Engine’s RPM
Introduction
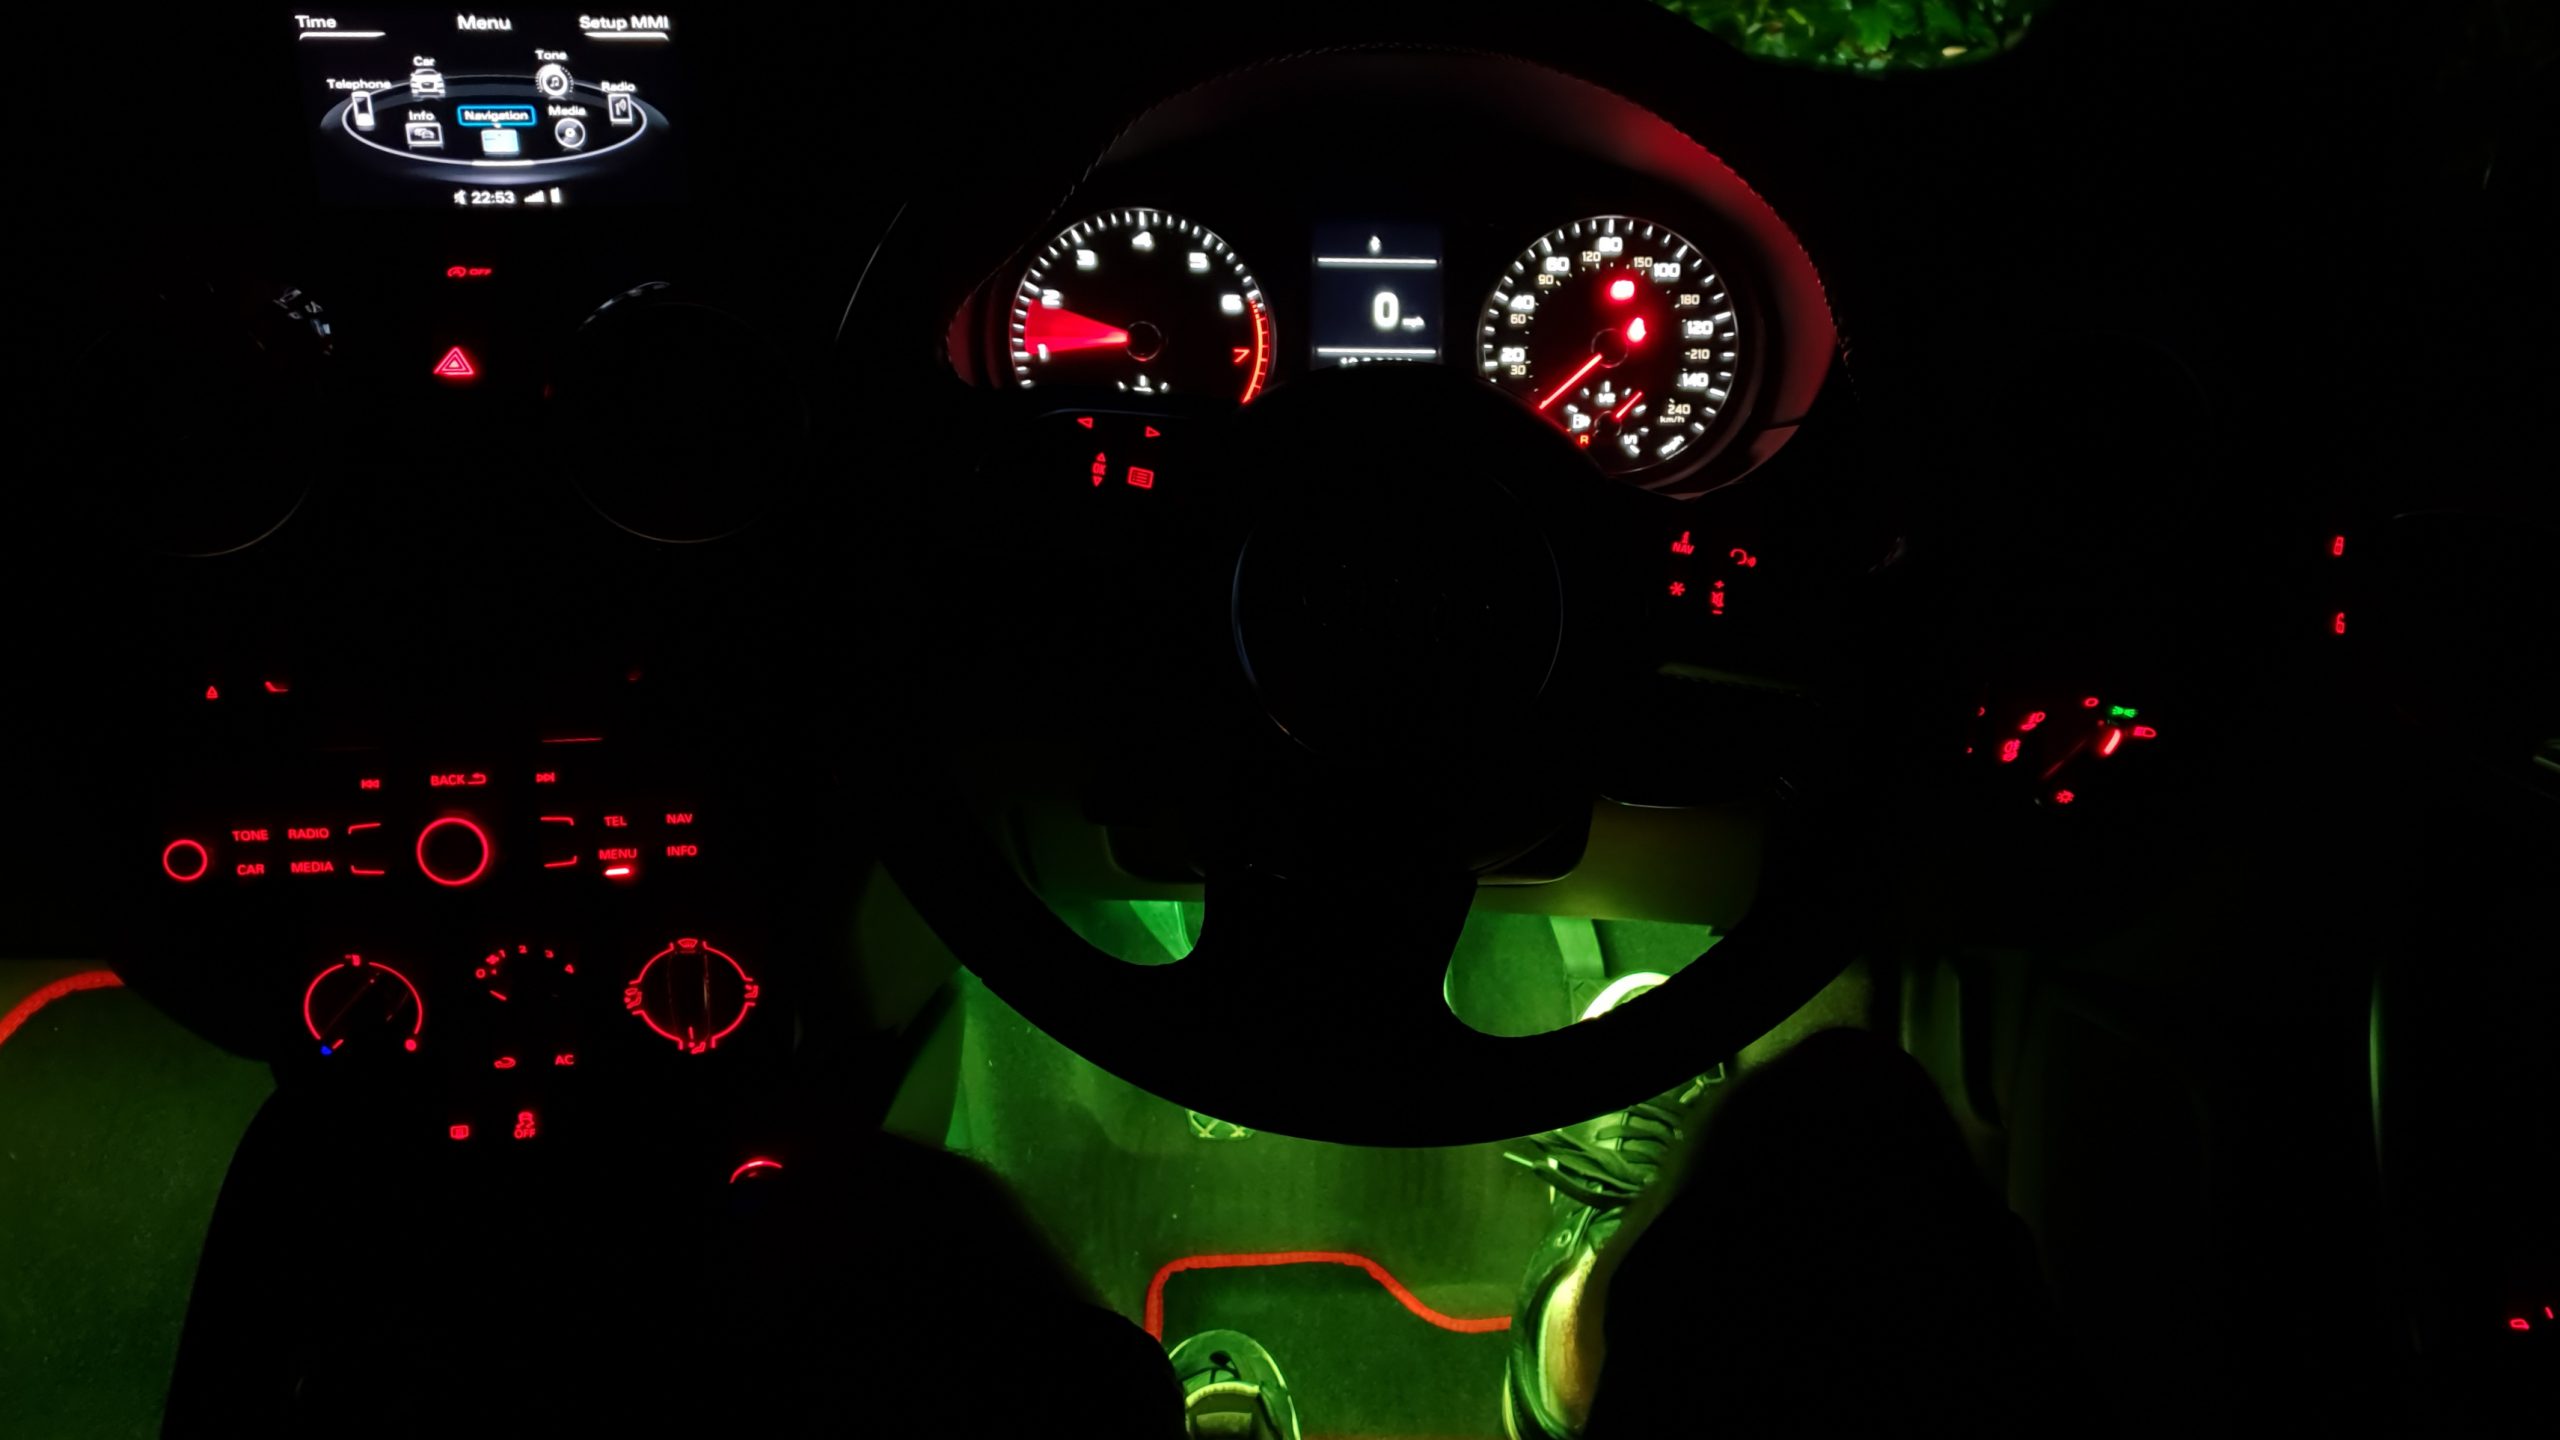
A while back I got some footwell lights which are usually controlled via an Android/iPhone app "Lotus Lantern"; however, after sticking them in my car, I wondered about ways to integrate them more seemlessly to the car itself, which would eliminate the need to handle my phone whilst in the car to change the lights. Naturally, I wanted to tie them into the car's OS, but instantly concluded that was beyond my abilities (and I also don't want to brick my car). Having just finished a Mobile and Ubiquitous Computing module at University, I was intrigued by the idea of having the lights react to their environment without the need for human interaction... How about having them react to the car? This brought about the idea of tying the engine's RPM to the colour of the lights.
To achieve this, I'm going to create an Android application with the following devices:
- Samsung Galaxy Note 9
- Lotus Lantern controlled lights
- Bluetooth OBD2 scanner
Having settled on the idea for the project, and armed with the equipment, I've broken it down into its 3 major components:
Reverse Engineering the Bluetooth Protocol
To begin with reverse engineering the protocol, let's enable Bluetooth HCI snoop logging on our device - this allows logging of Bluetooth traffic from the device, which can be viewed to understand what values are being sent to perform different actions. For my Galaxy Note 9, this was a simple process of:
- Enabling Developer options
- Setting Enable Bluetooth HCI snoop log to Enabled
- Toggling Blueooth - and restart the phone for good measure!
With this set up, we're ready to capture some Bluetooth traffic. For convenience, I've taken the lights out of my car, which I crudely wired to a USB cable, so I can do this from my desk.
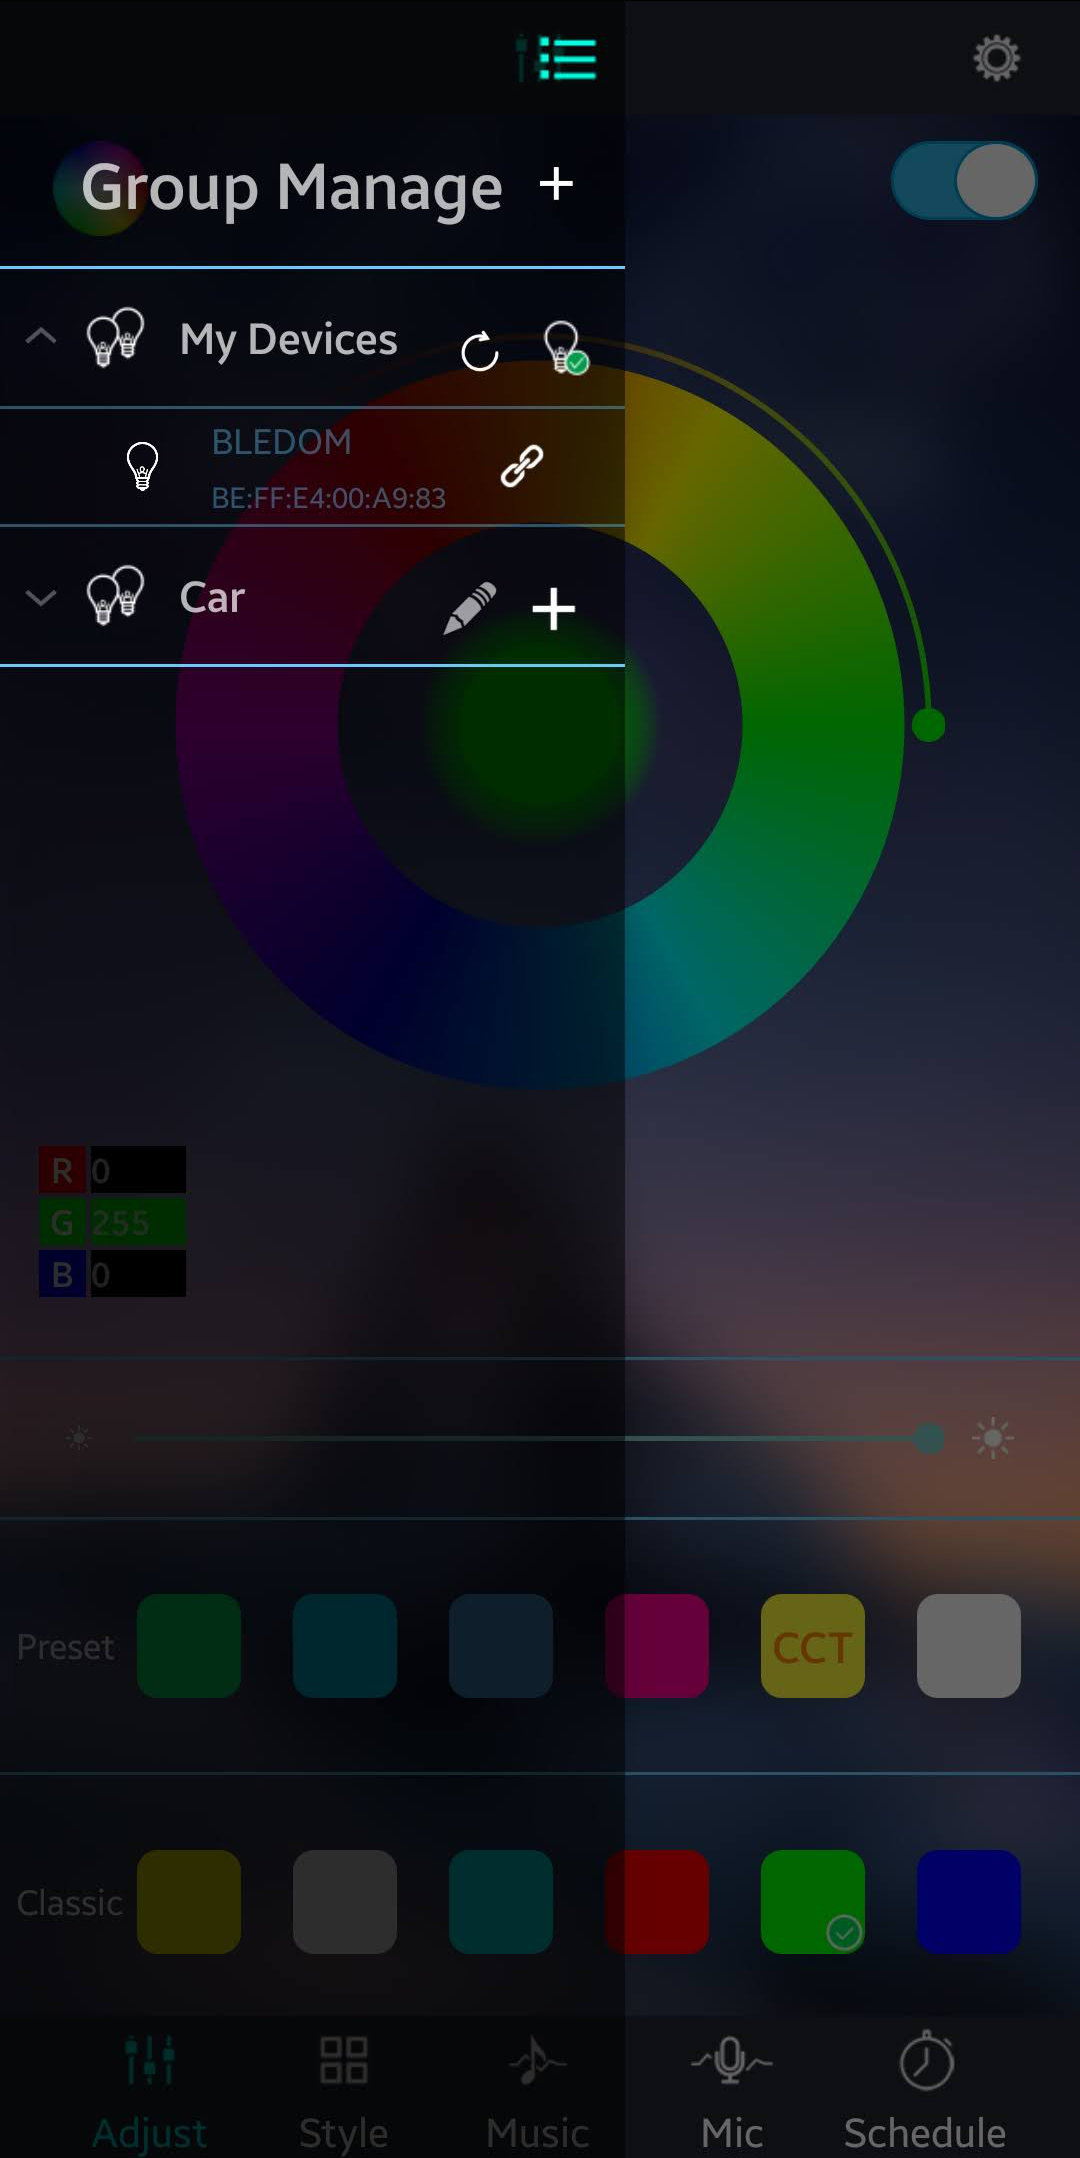
To start off, let's open the Lotus Lantern app and ensure the lights can be connected to. Note the MAC address shown here, BE:FF:E4:00:A9:83, as this will be used later.
With the app open, we can perform a series of colour changes that will hopefully help us identify their corresponding packets in the log. I changed the lights to red, blue, green and then back to red. After performing these changes, it's time to export the Bluetooth log in order to inspect it on a computer. The instructions may differ per Android device; however, this outlines what I did for mine (Galaxy Note 9).
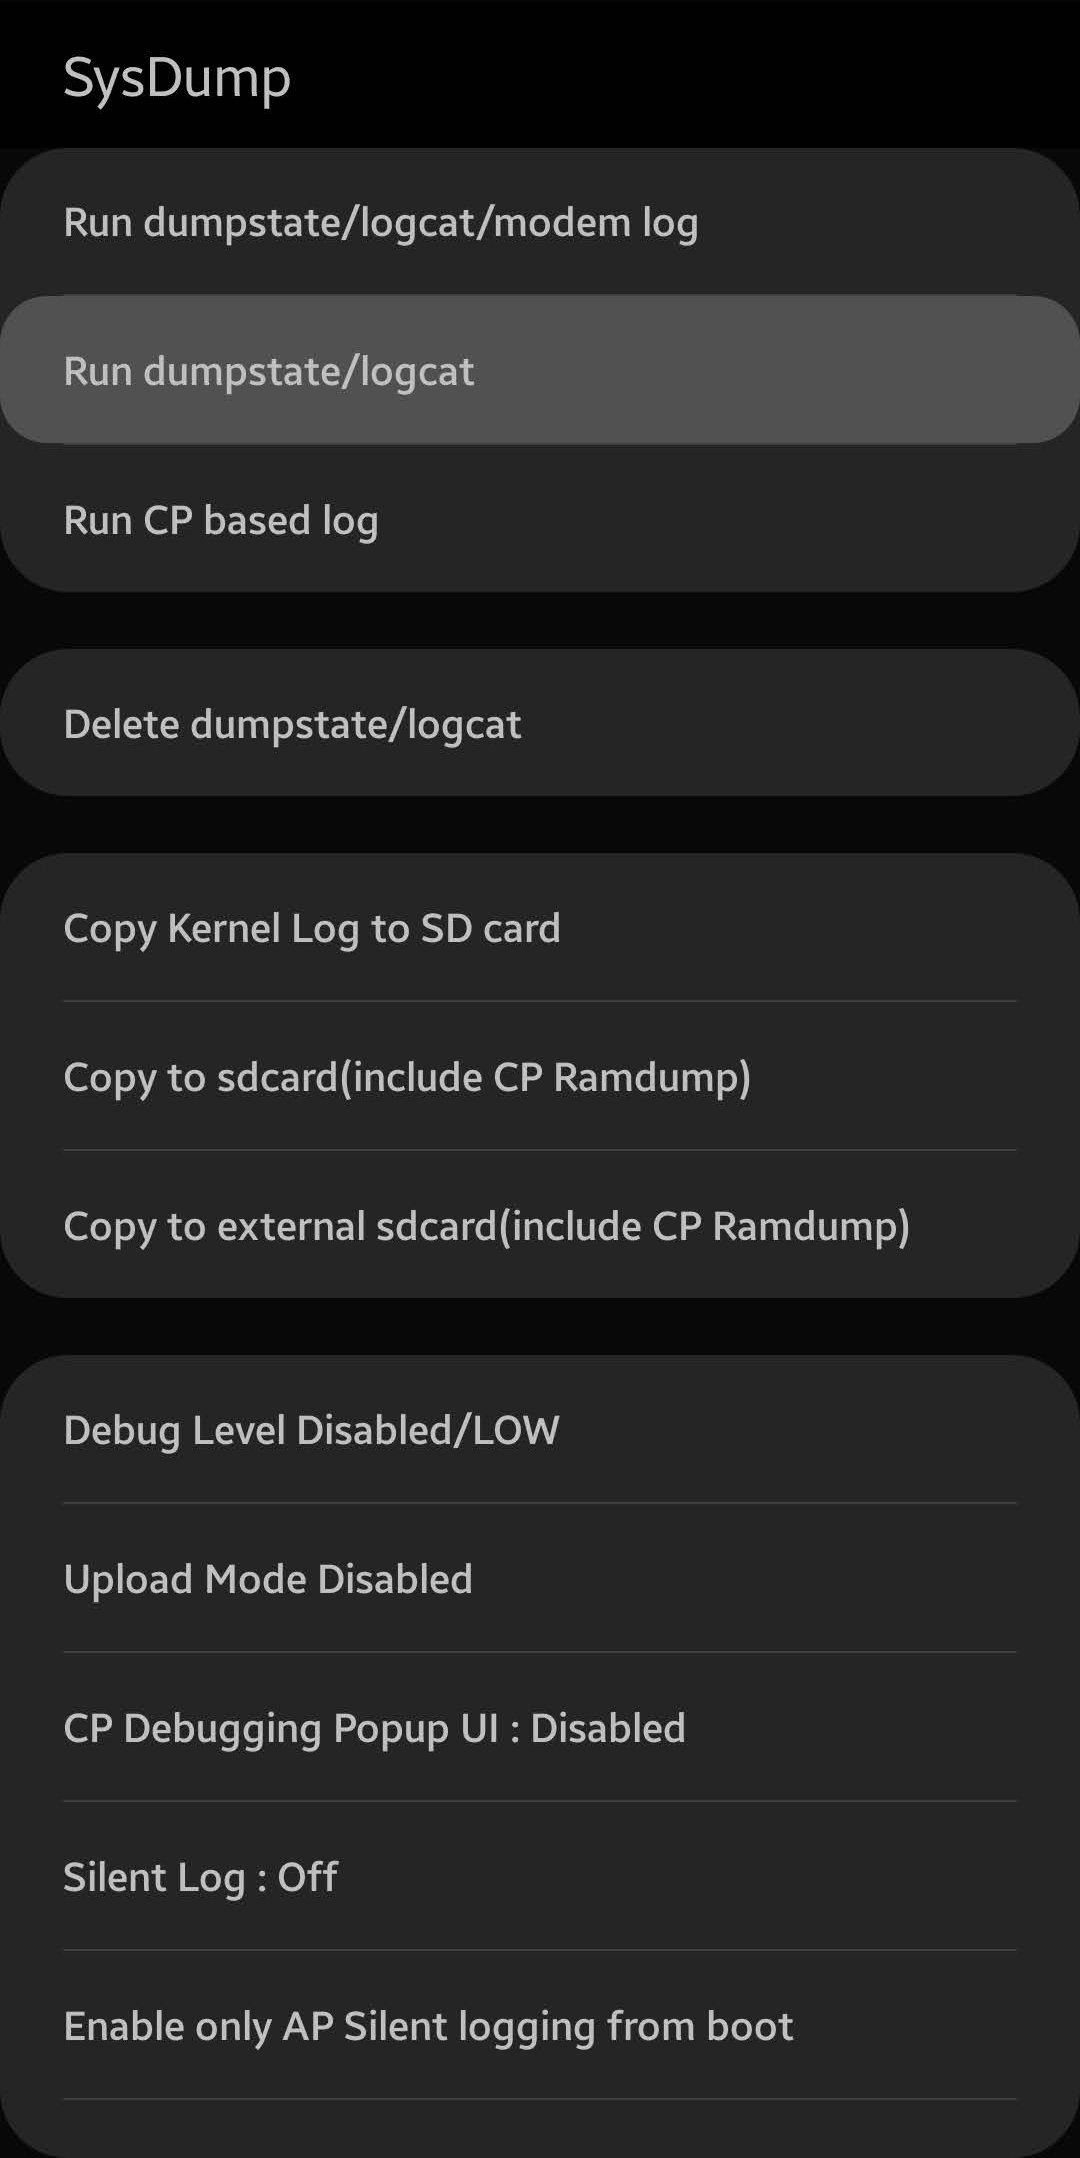
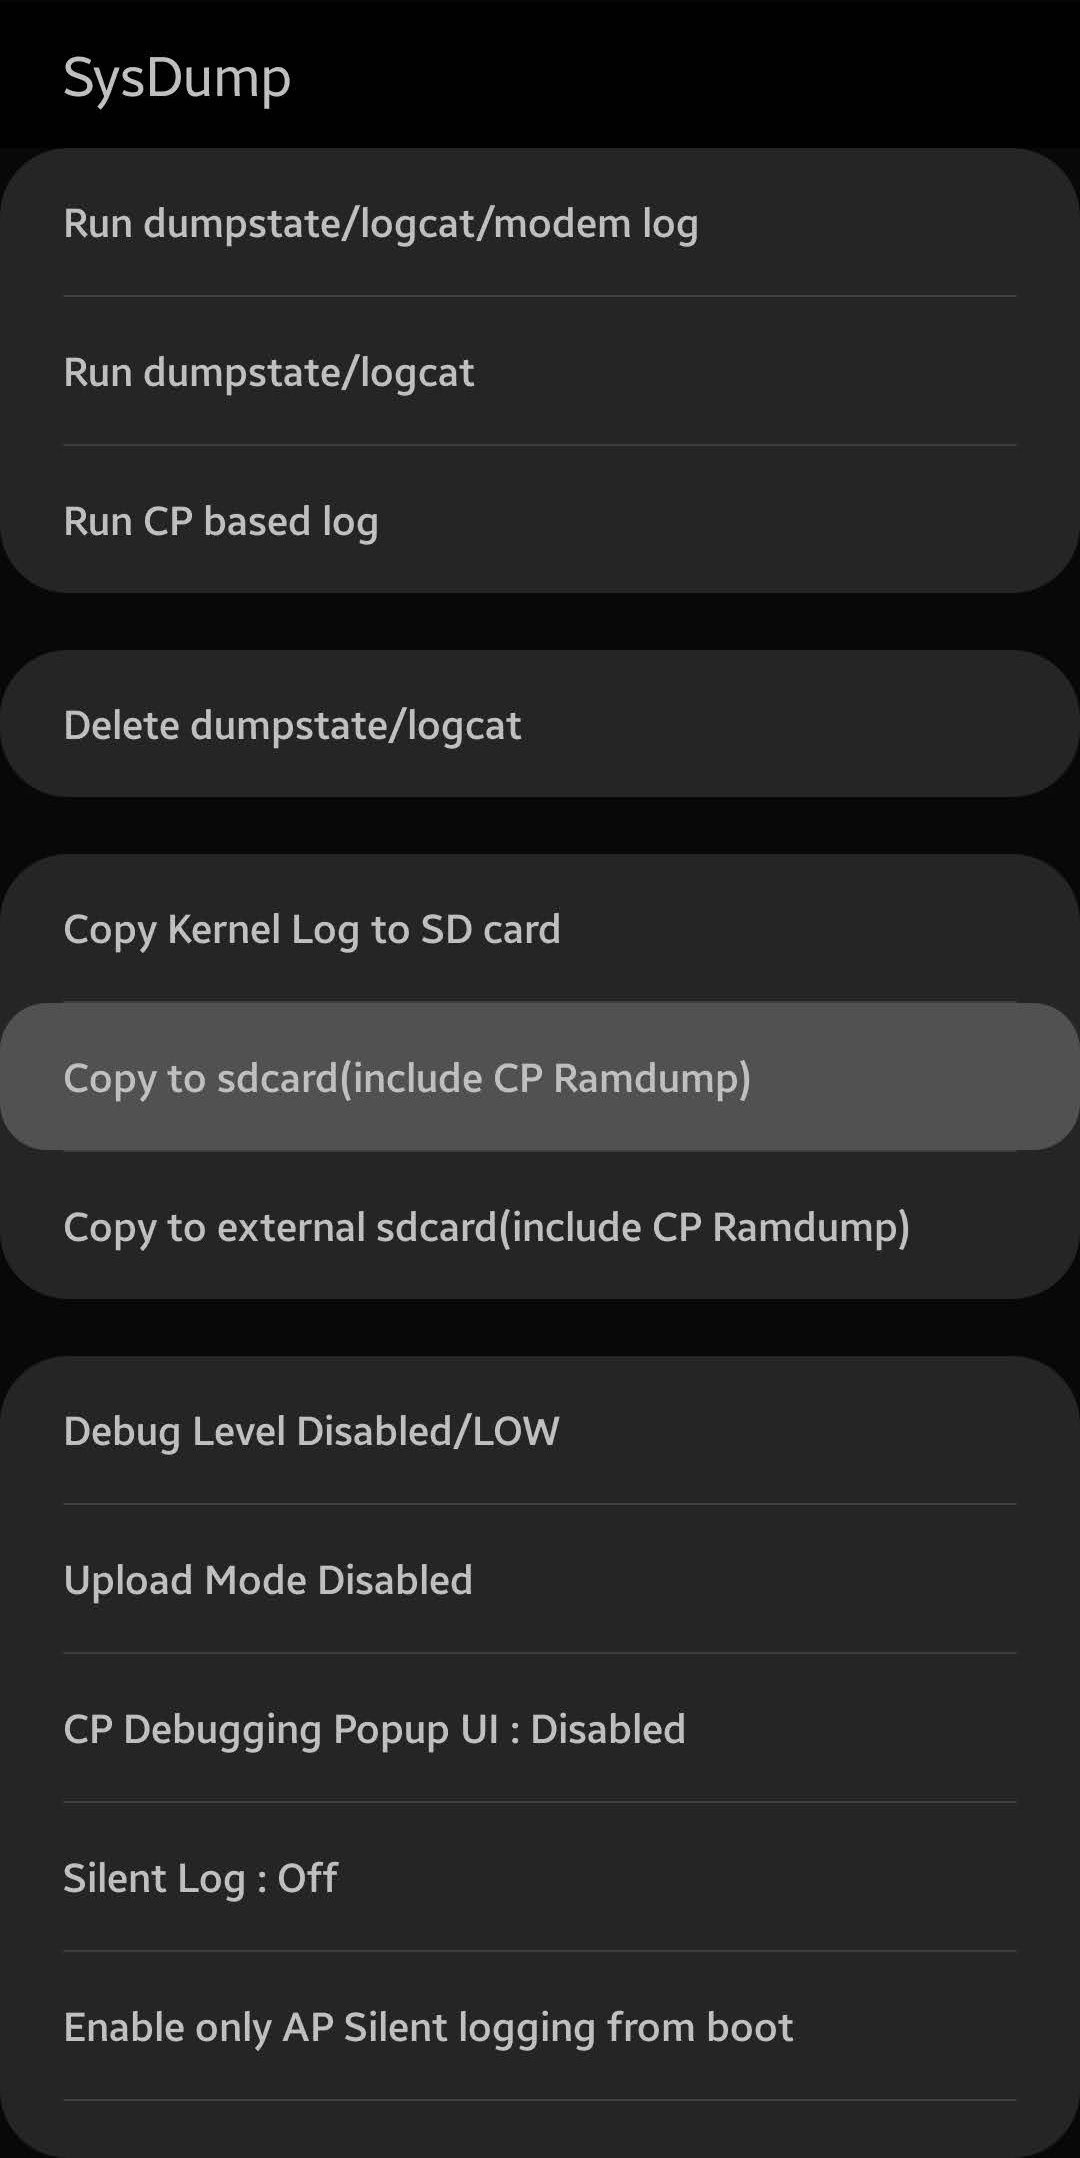
I opened the phone app and dialled *#9900# - this opened the SysDump menu. In here I chose the Run dumpstate/logcat option. This took a few minutes to complete and eventually a popup was displayed showing the internal location of the generated logs. For ease of access, I then ran the Copy to sdcard(include CP Ramdump) command, which copied the logs to my internal emulated storage, which is easily browsable with a file explorer.
After copying the logs to the internal storage, I found them at the following path (this also may differ per device):
/Internal storage/log/bluetooth/btsnoop_hci_<datetime>.cfa
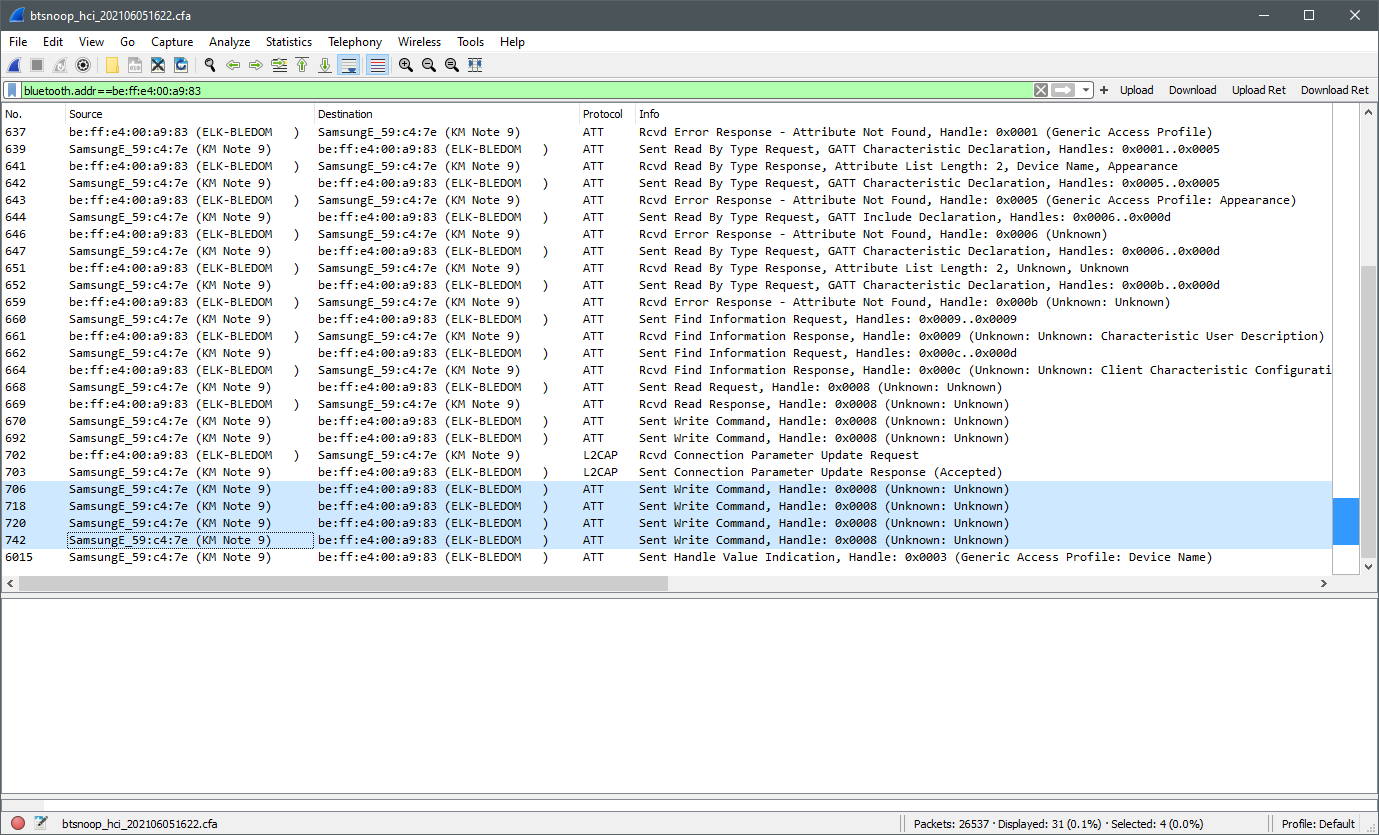
The .cfa file here is actually a btsnoop binary file, which can be opened with WireShark, so that's exactly what we'll do. To cut down the log entries, let's use the following filter to only show traffic to/from the lights (using the MAC address from earlier):
bluetooth.addr==be:ff:e4:00:a9:83
For a quick and comprehensive overview of Bluetooth Low Energy (BLE), I'd highly recommend the ArduinoBLE Library's documentation. The types of packets we're interested in are likely writes to characteristics, hence look for the Sent Write Command packets, as shown below:
In the Packet Details view in Wireshark, the service UUID, characteristic UUID and the value written to the characteristic are visible. From these, we know we're interested in the FFF0 service and the FFF3 characteristic. Recall the chosen colour sequence earlier (red, blue, green, red), this pattern can be seen by navigating between the packets in the below gif:
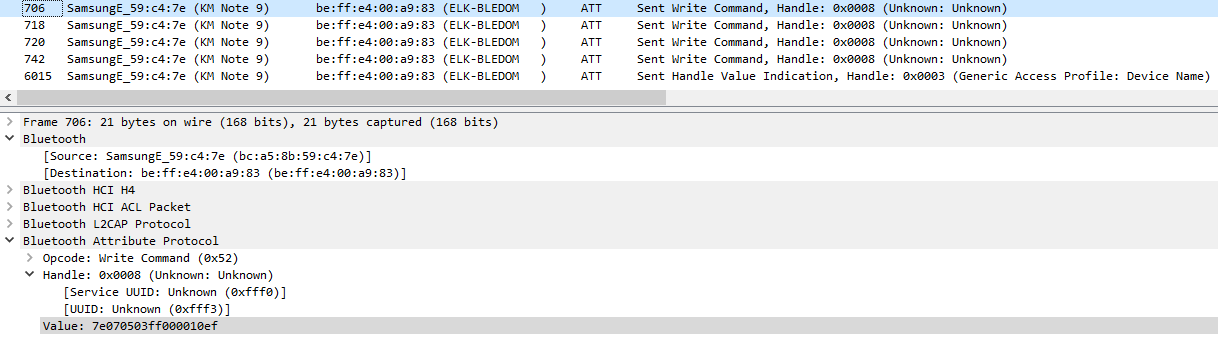
If you're familiar with hexadecimal representation of colours, these should jump right out at you. Analysing the values, the pattern can be seen below for the colour sequence (red, blue, green, red):
7e070503ff000010ef
7e0705030000ff10ef
7e07050300ff0010ef
7e070503ff000010ef
This shows that in this case, the RGB values correspond nicely to bytes 4-6 (zero-indexed). From this, we can construct a packet of an arbitrary colour, using the following value format:
7e070503RRGGBB10efNow that the service UUID, characteristic UUID and the value payload structure have been established, it's time to implement the protocol.
Implementing the Bluetooth Protocol
For the implementation, some values need addressing. The UUIDs found previously are, what are referred to as, short UUIDs. Further specification on Bluetooth values can be found here. The full-length base UUID value is the following:
00000000-0000-1000-8000-00805F9B34FBThe short UUIDs can be converted to full-length UUIDs by performing a bitwise OR between the base UUID and the short UUID right-shifted by 16 bits. In other words, replace the highlighted bytes above with the short UUID. Using this, let's create a new table of all of the information about the lights and its protocol:
| Name | Value |
|---|---|
| MAC address |
BE:FF:E4:00:A9:83 |
| Service UUID |
0000fff0-0000-1000-8000-00805f9b34fb |
| Characteristic UUID |
0000fff3-0000-1000-8000-00805f9b34fb |
| Value format |
7e070503RRGGBB10ef |
This section is not going to be a step-by-step walkthrough on Android app development, but key elements will be highlighted and explained. For further context, have a look at the code in the GitHub repository. Please note that the code snippets used here have been adapted from the actual codebase to emphasise the context more, instead of the software design aspect.
To connect to these lights, as touched on previously, we'll be using Bluetooth Low Energy (BLE). I highly recommend the Android Bluetooth Low Energy guides to familiarise yourself with the BLE API for Android. The outline of the plan is the following:
- Connect to the lights
Determine the remote device and its GATT server - Determine the characteristic
Find the service and its characteristic - Send colours
Write values to the characteristic
So to start, we'll need the device's Bluetooth adapter, which we can get with the following code from an application Context:
final BluetoothManager manager = getSystemService(BluetoothManager.class);
final BluetoothAdapter adapter = manager != null ? manager.getAdapter() : null;
With this we can retrieve the remote device from a given MAC address and connect to its GATT server:
final BluetoothDevice device = adapter.getRemoteDevice(address);
device.connectGatt(context, false, new LightConnectionHandler(this));
If you look at the documentation for connectGatt, you'll notice that you can pass a BluetoothGattCallback derived object in. This is an abstract class that can be implemented to define the asynchronous callback methods that are triggered when there are changes in the connection. In this case, I've implemented one in LightConnectionHandler.
The onConnectionStateChange method is called, as suggested by the name, when the connection state to the GATT server is changed in some way. We can use this to determine if we have successfully connected to the server in order to start service discovery - although we know our service UUID, we can't access it until a service discovery on the server has completed, otherwise it will return null. The following, simplified, snippet shows how we can start the service discovery when the initial connection to the GATT server has been made. Note, this will be called asynchronously after the connectGatt call from above.
@Override
public void onConnectionStateChange(BluetoothGatt gatt, int status, int newState) {
    super.onConnectionStateChange(gatt, status, newState);

    if (status == BluetoothGatt.GATT_SUCCESS && newState == BluetoothProfile.STATE_CONNECTED && gatt.discoverServices() {
        // Connected and started scan successfully. Just need to wait for the services now.
    } else {
        // Disconnected.
    }
}
In order to be able to access services and characteristics, service discovery needs to be done first despite us knowing our service UUID.
Thankfully, the BluetoothGattCallback class also has a method onServicesDiscovered, which we can use to run code when the service discovery has completed. As explained above, this is the part where we can access the service, and hence the characteristic that we need. The subsequent simplified snippet shows how this can be done. Note, this will be called asynchronously after the discoverServices call from above.
private static final UUID serviceID = UUID.fromString("0000fff0-0000-1000-8000-00805f9b34fb"),
        characteristicID = UUID.fromString("0000fff3-0000-1000-8000-00805f9b34fb");

@Override
public void onServicesDiscovered(BluetoothGatt gatt, int status) {
    super.onServicesDiscovered(gatt, status);

    if (status == BluetoothGatt.GATT_SUCCESS) {
        final BluetoothGattService service = gatt.getService(serviceID);
        if (service != null) {
            final BluetoothGattCharacteristic characteristic = service.getCharacteristic(characteristicID);
            if (characteristic != null) {
                // Successfully connected.
                // Now we can store this characteristic and gatt somewhere.
            }
        }
    }
}
Now that we have the BluetoothGattCharacteristic that we want to write to, it's time to try writing to it. For ease of testing, I added a Randomise button to the app and implemented an onClick callback for it. Colours in Android are represented as byte packed integers (as hex colours are), so to generate a random colour, we need to generate 3 random values from 0-255 for the red, green and blue colour channels. There is a convenient method to pack these into an integer in the Color class, Color.rgb.
final Random random = new Random();

// Generate a random colour via its channels.
final int r = random.nextInt(256),
    g = random.nextInt(256),
    b = random.nextInt(256);
final int colour = Color.rgb(r, g, b);
Now that we've got our randomly generated colour packed into an integer, we can pass it to some method to write the colour to the characteristic. Before we can do that, we should set up our code to represent the characteristic value format we found from reverse engineering the protocol in the first place. We can do this by creating a method which will return a byte array representing the bytes we need to send for a given colour, as so:
private final byte[] payloadBuffer = new byte[]{0x7e, 0x07, 0x05, 0x03, 0, 0, 0, 0x10, (byte) 0xef};

private byte[] getColourPayload(byte red, byte green, byte blue) {
    // Put the RGB values into the payload at the right positions.
    payloadBuffer[4] = red;
    payloadBuffer[5] = green;
    payloadBuffer[6] = blue;

    return payloadBuffer;
}
Note that the contents of payloadBuffer are representative of the format we listed in the table at the start of this section. All this method does is replace bytes 4-6 with the red, green and blue values we specify without re-allocating the array. The last value in the byte array needed to be cast back to a byte because, as explained in the Java SE documentation, bytes are signed two's complement integers, meaning that they have an inclusive range of -128 to 127. Since 0xEF is (unsigned) 239, it has to be cast to fit into a Java byte to keep the bit representation the same as if it were unsigned - this is very important as the values will matter at a bit level to the Bluetooth controller on the lights.
Now we can get the bytes needed to change the colour, we can make a method to write a given byte packed integer colour. In order to get the byte values needed for our method above, we can use the provided Color.red, Color.green and Color.blue methods that perform bitwise operations to mask them out and cast them to bytes:
public void setColour(int colour) {
    // Unpack the colour into its bytes.
    final byte red = (byte) Color.red(colour),
            green = (byte) Color.green(colour),
            blue = (byte) Color.blue(colour);

    // Update the payload buffer with the correct parameters.
    byte[] payload = getColourPayload(red, green, blue);

    // Write to the characteristic and send it.
    characteristic.setValue(payload);
    gatt.writeCharacteristic(characteristic);
}
Et voilà! This is enough to be able to control the lights by sending random colours. Just for re-assurance that the colours are correct, I implemented this in the callback for the Randomise button, like so:
public void onLightsRandomisePressed(View view) {
    // Generate a random colour via its channels.
    final int r = random.nextInt(256),
            g = random.nextInt(256),
            b = random.nextInt(256);
    final int colour = Color.rgb(r, g, b);

    // Send this via the connection to the light.
    lightConnection.setColour(colour);

    // Visualise the colour on the randomise button.
    lightRandomiseButton.setBackgroundColor(colour);
}
And with that, the Randomise button changes colour to match the colour sent to the lights. Now that we can change the collour of our lights via BLE, it's time to read and use data from the Bluetooth OBD scanner.
Using Data From the OBD2 Scanner
To talk to the OBD scanner, we will be using Bluetooth again, but this time it will be Bluetooth Classic (instead of Low Energy), and more specifically the Serial Port Profile for wireless serial communication. If you're interested in finding out more about Bluetooth (Classic) on Android, I'd suggest the Android Bluetooth guides; however, surprisingly little knowledge is required for what we're doing!
I'd like to thank Elton Viana et al. for their hard work on the Java OBD API project, which we will be using for this section.
In the GitHub respository, I've implemented this as a class wrapper around a thread with callbacks; however, I'll just be explaining the core concepts here.
The first thing we need to do is connect to our OBD scanner, and to do that, we need its MAC address. For this I used this Bluetooth Mac Address Finder app, which lets you look up the MAC addresses of nearby and previously paired devices. Using this, I found my scanner's MAC address:
00:1D:A5:68:98:8B
The next thing we need is the service record UUID to establish the RFCOMM channel - as mentioned earlier we are using the Serial Port Profile to replicate serial communication and send arbitrary commands to the device, the UUID for this is service is always:
00001101-0000-1000-8000-00805F9B34FB
With this, we can create a Bluetooth socket to the device which will allow us to send and receive data. We can do this with the createInsecureRfcommSocketToServiceRecord method from the remote device (similar to what we did previously) and get the IO streams to send/read data.
// Create and attempt to connect to the socket.
final BluetoothDevice device = adapter.getRemoteDevice(address);
final BluetoothSocket socket = device.createInsecureRfcommSocketToServiceRecord(serialPortProfile);
socket.connect();

final InputStream in = socket.getInputStream();
final OutputStream out = socket.getOutputStream();
Simple right? Now we just need to use the OBD API with our streams to send the right commands. First of all, we need to set up the adapter to use the correct protocols. With the API, we can batch these commands together and run them with our IO streams, like so:
// Initialise the OBD2 adapter with a 100ms timeout.
final ObdCommandGroup obdCommands = new ObdCommandGroup();
obdCommands.add(new EchoOffCommand());
obdCommands.add(new LineFeedOffCommand());
obdCommands.add(new TimeoutCommand(100 / 4));
obdCommands.add(new SelectProtocolCommand(ObdProtocols.AUTO));

obdCommands.run(in, out);
One thing to note here is that the timeout for commands is a value between 0 and 255, which is then multiplied by 4 to get the desired timeout, hence for 100ms, you pass in 25 (100/4).
Now that's done, we want to continuously get the RPM in real-time from the scanner. To do this, all we need to do is create an RPM command and continuously loop and send it. The API does all the response parsing for us, so to implement this, all we need to do is the following:
final RPMCommand rpmCommand = new RPMCommand();
while (socket.isConnected() && !Thread.currentThread().isInterrupted()) {
    rpmCommand.run(in, out);
    final int rpm = rpmCommand.getRPM();
    // Now we can use our RPM to determine our colour!
}
Brilliant! Note, if you're not doing this on a separate thread, this will pretty much freeze up your application. But just like that, we're wirelessly getting the RPM from the car, in real-time, as an integer in Java!
Now that's done, we just need a way of mapping it to a colour to send to the lights. For this we're going to use linear interpolation to smoothly transition between set colours at a given time or progression value. Rather funnily, this is perhaps the most code we'll have to write for this section. To lerp between two colours, we simply need to lerp each colour channel and then combine the result back into a colour, so let's write a basic integer lerp function:
private static int lerp(int a, int b, float t) {
    return Math.round(a + t * (b - a));
}
Using this, we can write another function that takes two colours, unpacks their channels, lerps the channels and then combines them back into a single colour:
public static int lerpColour(int colourA, int colourB, float t) {
    final int red1 = Color.red(colourA), red2 = Color.red(colourB),
            blue1 = Color.blue(colourA), blue2 = Color.blue(colourB),
            green1 = Color.green(colourA), green2 = Color.green(colourB),
            alpha1 = Color.alpha(colourA), alpha2 = Color.alpha(colourB);

    final int red = lerp(red1, red2, t),
        green = lerp(green1, green2, t),
        blue = lerp(blue1, blue2, t),
        alpha = lerp(alpha1, alpha2, t);

    return Color.argb(alpha, red, green, blue);
}
And now finally, we need a function to determine the colour from an RPM value. I've chosen to do this as the following:
| RPM | Colour |
|---|---|
| 1000 | Green |
| 1500 | Yellow |
| 2000 | Red |
This keeps it nice and easy for testing, and doesn't annoy the neighbours with high revs! The logic behind this is quite simple, if it's below 1000, we know we want green. Similarly if it's above 2000, we know we want red. If it's between 1000 and 1500, we want to lerp between green and yellow by the same amount as the RPM is between 1000 and 1500. Likewise, we want to do the same for values between 1500 and 2000 for yellow and red respectively. This can be done with the following function:
private static int calculateColourFromRPM(int rpm) {
    // Map 1000, 1500 and 2000 RPM to green, yellow and red respectively.
    // Keeping the revs low for testing - you're welcome neighbours!
    final int colourA, colourB;
    final float t;

    if (rpm <= 1000)
        return Color.GREEN;
    else if (rpm <= 1500) {
        // Lerp between GREEN and YELLOW.
        colourA = Color.GREEN;
        colourB = Color.YELLOW;
        t = (rpm - 1000f) / 500f;
    } else if (rpm <= 2000) {
        // Lerp between YELLOW and RED.
        colourA = Color.YELLOW;
        colourB = Color.RED;
        t = (rpm - 1500f) / 500f;
    } else
        return Color.RED;

    return lerpColour(colourA, colourB, t);
}
And there we have it: a method of determining the colour from the RPM. All that's left to do is tie this into the part above where we get the RPM from the scanner. That will give us the colour, and we already know how to send a colour to the lights. Put those together and you've got your engine's RPM changing the colour of your lights in real-time!
For a working version of this application, please see the GitHub repository. For a visual demonstration, see the video below:
Does it make the car go faster 🙂
It certainly does! Not that I’d advise driving with them, to minimise distraction 😀